This guide was designed for beginner's who have very little to no experience in reversing, so the guide will be fairly straightforward. I suggest learning about C, x86 Assembly, the PE Specification, and of course, how to use a debugger.
Tools
The tools required for reversing will span far beyond the scope of this article however, you will be introduced to several vital tools:
- Ollydebug - the olly debugger, a scripted and powerful tool which will aid us for dynamic analysis of a closed-source program.
- PEiD - A useful tool for detecting packers, compilers and PE information.
- PE Explorer - Used for PE analysis, includes a disassembler
- IDA Pro - A static disassembler, very vital for understanding how assemblies work.
We'll be using a canned program called a crackme to get you acquainted with RCE. The crackme is called Zyrel's Simple KeygenMe#2 and the basic goals are to create a KeyGen.
Sometimes, we can use existing code to write a keygen, other times we must reverse the algorithm used to compute the serials. Since this is a beginner tutorial, you don't have to worry about reversing those algorithms.
PE Analysis
Start the program. You'll notice the Name and Key field. This should be pretty obvious. Typing in junk into those fields and clicking register will either a) cause the program to crash (a bug) or b) do nothing.
Load the program into PEiD. You can see standard PE segments, an entry point which is within .text and a "nothing found" on the bottom field. This just means that the program was written in standard C/C++, gcc probably. Also, note there is no packer installed (although this is not always the case).
Static Analysis
Open PE Explorer, let's see if we can determine anything from there. As we can see from the disassembler, nothing clear is shown for us (just remember, keep PE Explorer around, it will become more useful as the programs we're reversing become more complex).
Start IDA Pro, we will use it for static analysis of the program routines. Okay, I usually set auto-comments, stack values, and 9 opcode values. First, let's examine the strings window. Allow for C style strings (NULL terminated). You can see the strings used for the fields, title of the program and, most importantly, the strings used for notifying us of success (if we entered the right serial key):
.rdata:0043F084 00000037 C Seriale corretto, programma correttamente registrato.!
This looks like what we want. So this string is read once we type in the correct key. Double click on it. This will move you to the .rdata segment which contains the string. Select the string XREF. As you can see, this string is referenced only once in the code. Probably by the routine which tells us whether or not we have succeeded.
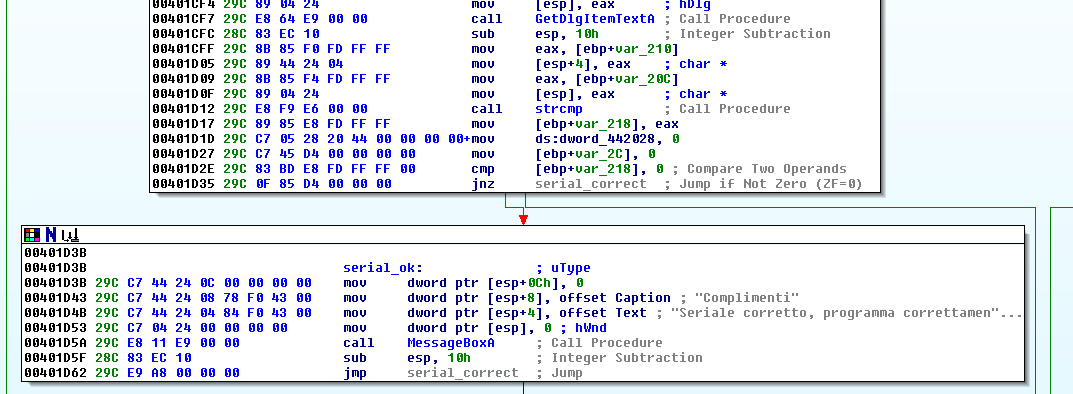
We can see that 00401D3B is branched off from a jnz (jump if not zero) instruction @ 00401D35. A cmp instruction @ 00401D2E checks that [ebp + 218] is equal to 0. As we can see, strcmp is called @ 00401D12, which compares two strings at [esp] and [esp + 4]. There is a high probability that the two strings are your input Key field (judging by a call to GetDlgItemTextA), and the computed string value. Perfect, this means we just have to fish for the key at runtime.
You may also go further up the function to determine which routine is used to compute the serial. This is not necessary as the only goal of the crackme is to create a keygen.
Label what you require and use IDA to export a .map file.
Dynamic Analysis
Once you have Ollydbg going, install the GODUP plugin. Load the crackme inside Olly, you'll notice that Olly will stop at the module entry point. Go to the GODUP plugin and load your .map file. This file will make use of the comments and function names generated by IDA, it will make it easier for us to orientate ourselves within code.
Go to instruction 00401D35, our jnz instruction indicated by IDA. Place a breakpoint on that instruction and run the program. Type in anything for the name field, and type in anything for the Key. The program should stop at 00401D35. The key is probably wrong, therefore cmp will check the output of strcmp (at ebp - 0x218), and set the EFL z-flag to 0 - jnz will jump to subroutine 00401E0F; we do not want this. Set the z-flag to 1, so the jump never occurs and our MessageBox says "Complimenti":

So, I've set EFL Z-Flag to 1, so the jump never takes place. Press F9 and you'll see that the Congrats message box tells us that we've found the serial. Also note:
strcmp() is passed [ebp - 0x20c] and a pointer stored in [ebp - 0x210]. These pointers are the generated key and typed-in key, respectively. Strcmp will obviously return -1, indicating that the strings do not match, this value will be stored in [ebp - 0x218]. cmp will then check that [ebp - 0x218] is 0 (which is the successful return value of strcmp()), if it is 0xffffffff, the serial and input serial do not match, therefore the MessageBoxA is never called.
As you can see, [esp] contains a pointer to the actual serial key and [esp + 4] contains our input key.
Patching
Next, we must patch the program in order to write the key generator for this keygenme. We can either:
- Reverse the algorithm
- Patch the program
Okay, so the game plan is to remove instructions which we do not need and replace them with our own. I think the best way to do this would be:
NOP the cmp instruction at 00401D2E, which will give us 7 bytes of space.
NOP the jnz instruction at 00401D35, which will give us 6 bytes of space.
Also, NOP these four instructions:
.text:00401D3B 29C C7 44 24 0C 00 00 00 00 mov dword ptr [esp+0Ch], 0
.text:00401D43 29C C7 44 24 08 78 F0 43 00 mov dword ptr [esp+8], offset Caption ; "Complimenti"
.text:00401D4B 29C C7 44 24 04 84 F0 43 00 mov dword ptr [esp+4], offset Text ; "Seriale corretto, programma correttamen"...
.text:00401D53 29C C7 04 24 00 00 00 00 mov dword ptr [esp], 0 ; hWnd

Make sure you don't overwrite the Call to MessageBoxA, as we'll be using it to pass the serial key as a parameter:

Now that the junk has been NOP'd out, let's begin by passing our values onto the stack. MessageBoxA requires the following parameters:
int WINAPI MessageBoxA(
__in_opt HWND hWnd,
__in_opt LPCTSTR lpText,
__in_opt LPCTSTR lpCaption,
__in UINT uType
);
So, uType can be NULL, lpCaption can be NULL, lpText must be a pointer to our generated serial buffer, and our HWND (window handle) may be NULL:
[esp] hWnd
[esp + 4] lpText
[esp + 8] lpCaption
[esp + 12] uType
Alright, now we must craft the instructions which will manipulate the stack and push the proper parameters. Be careful with this part: do not expand or shrink the size of the stack, do not modify any registers except eax (because MessageBox will return a value through eax) and do not overwrite any other instruction except the NOP pool we have.
So, what instructions do we need? well, the stack has already been adjust for the compiler (instruction sub @ 401cfc), so we don't need to push anything, instead, we just modify the values on the stack to suit MessageBoxA:
mov eax, [esp] ; Load pointer at top of the stack to eax register
mov DWORD PTR [esp], 0 ; Zero out our hWin parameter
mov DWORD PTR [esp + 8], 0 ; Set the Caption parameter to NULL
mov [esp + 4], eax ; Write our serial key pointer to as our lpText parameter
mov DWORD PTR [esp + c], 0 ; Set uType to NULL
So, your instructions should look like this:

Also, check that your stack parameters align with the requirements of MessageBoxA.
When you run the program, you will see a message box pops up with the serial key, regardless of what key you enter into the Key field!

Okay, so the final thing would be to commit changes to the program, you can do that by selecting the modified code and writing changes to exe.
Okay, this concludes the tutorial, I hope you learned something new. Try to understand as much as possible about this program, understand how the algorithm works, see if you can reverse it yourself.
My next tutorial will be about memory dumping and unpacking. Have fun!
No comments:
Post a Comment